This post is partly a blog, partly a reminder to myself of how I solved this — so the gritty details matter.
Original Setup
My house has two exterior doors, a front and a side door we call “rear”. Each door had a Google Nest Hello (wired) doorbell. I intentionally bought wired units, assuming I’d never have to think about batteries again. I also wanted to keep the Hampton Bay electronic door chime that came with the house. It took some finagling, but I got everything working. I did have to upgrade the transformer, though I was limited to 16 VAC output due to the requirements of the electronic chime. Still – it worked.
Five Years Later… Everything Falls Apart
Fast forward about five years, and both doorbells started failing:
- The electronic chime would ring only sometimes
- Video feeds were often interrupted
- Occasionally a Google Nest speaker would announce someone at the door – but often not
Eventually I learned the hard truth: “Wired” Nest doorbells still have an internal battery. That battery exists to handle the power draw while the chime is ringing – and mine were dead.
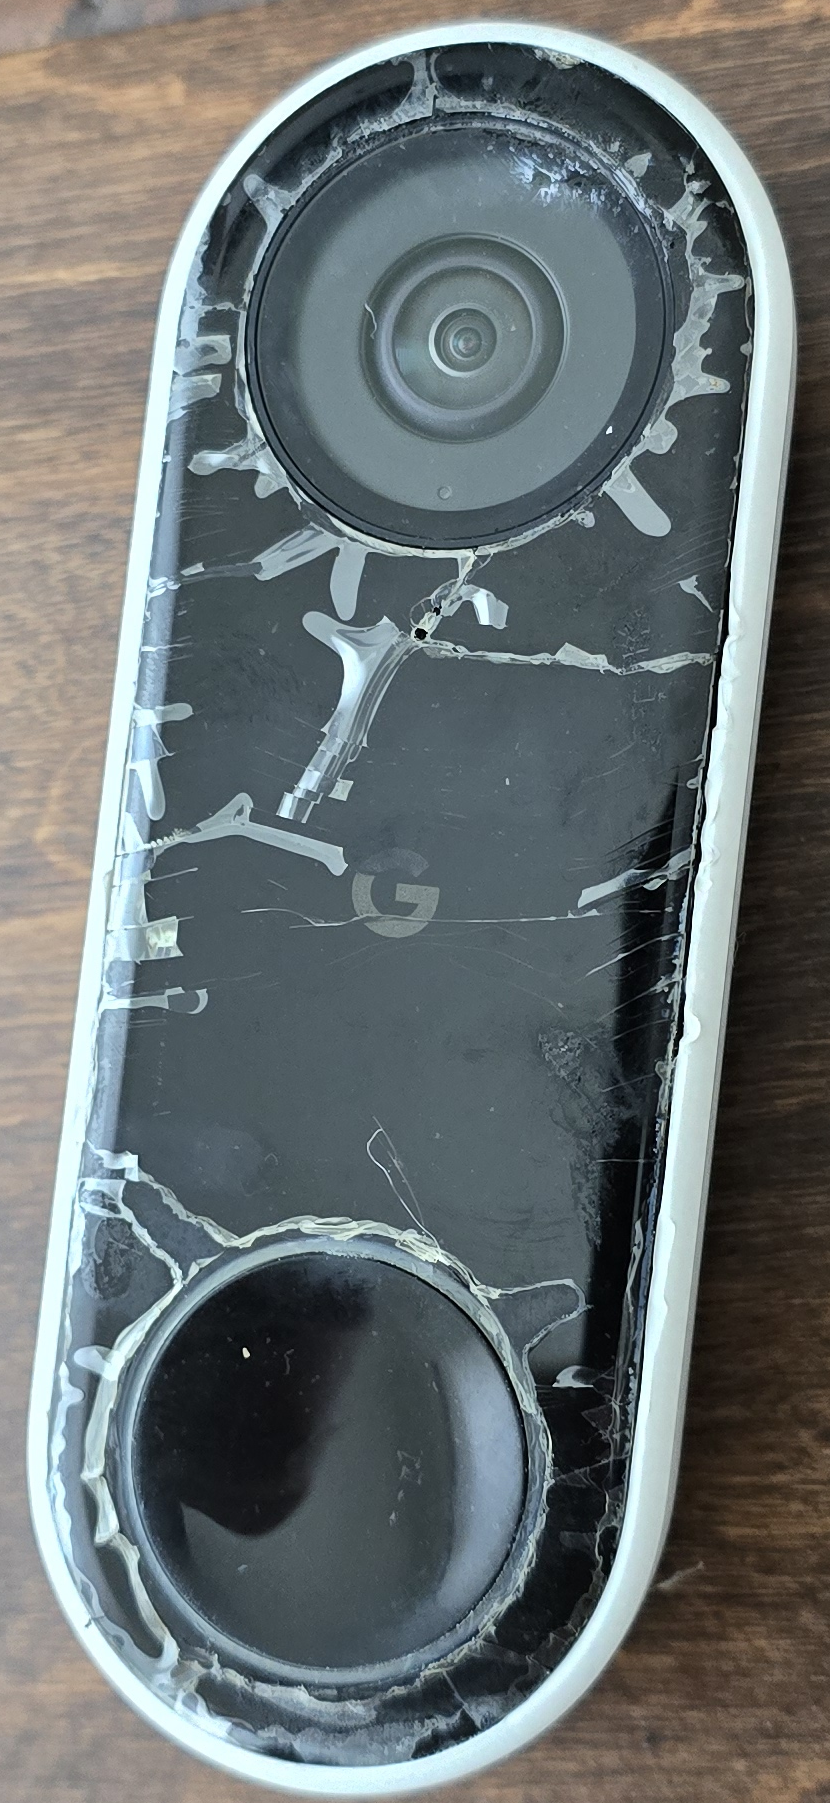
Battery Replacement (and Damage)
I replaced the battery in the rear unit first, and it mostly solved the problem. However:
- I tore the internal “heating blanket” during disassembly
- I omitted it during reassembly
- I had to crazy-glue the faceplate back on
- Cosmetically… it looks terrible
Still, it worked.
Just before Christmas, both doorbells failed again. I opened the front unit, which was harder to disassemble, again omitted the heating blanket – and it worked. For a few days.
5:30 AM Wake-Up Call
A few mornings later, the doorbell started ringing continuously at 5:30 AM. Turns out when I glued the bezel back on, I slightly caught the edge of the button. Once the unit warmed up, the button contacts closed — and stayed closed.
That was the final straw.
Rethinking the Google Ecosystem
When I invested in Google smart home gear, I tried to stick to Google hardware. Lately though, support has been… waning:
- Nest Protects are EOL
- Their official replacement (First Alert SC5) is harder to find in Canada and expensive.
- The thermostat still works — for now
- I like the cameras and doorbells, but subscription fees keep climbing
By contrast, I have Tapo cameras that:
- Record locally to microSD
- Require no subscription
- Are extremely reliable
Ideally, I’d replace both Nest Hellos with Tapo D225s, but it’s Christmas – budgets are real.
The Compromise
I bought a used Nest Hello for the front door, a Tuya Smartlife 2 channel relay and decided to fix the root problem properly.
The Real Fix: Electrically Isolating the Chime
After a lot of research, I realized the best solution was to separate the doorbell power from the chime power entirely.
I added a second transformer I already had, and fully isolated the circuits.
Transformer Layout
T1 Black (24VAC 30VA)
├─> NCC1 Grey/White "IN"  → NCC1 Grey/White "OUT"  → Front Nest Doorbell
└─> NCC2 Grey/White "IN"  → NCC2 Grey/White "OUT"  → Rear Nest Doorbell

T1 Yellow (24VAC 30VA)
├─> NCC1 White "IN" → NCC1 White "OUT" → Front Nest Doorbell
└─> NCC2 White "IN" → NCC2 White "OUT" → Rear Nest Doorbell
Each doorbell is powered cleanly via its own Nest Chime Connector, with no chime load involved.
Transformer T2 — 16 VAC (Chime + Tuya Relay)
T2 Black (16VAC)
├─> Tuya Relay Module AC Power Input
├─> Tuya Relay Channel 1 COM
└─> Tuya Relay Channel 2 COM

T2 Yellow (16VAC)
├─> Tuya Relay Module AC Power Input
└─> Chime Common (Yellow terminal)

Tuya Relay Channel 1 NO → Chime Black → Front chime strike
Tuya Relay Channel 2 NO → Chime Red   → Rear chime strike
The Tuya 2-channel relay now fully controls the physical chime.
Making It Ring Again (Software Pain Included)
With the hardware sorted, I moved on to Google Home automations to trigger the relay when a doorbell is pressed. Of course, Google had other ideas.
Missing Doorbell Events
The modern Google Home app no longer exposes the “doorbell ring” event. To access it:
- Create a new automation
- Tap the ☰ hamburger menu
- Select “Previous householder editor”
Only then does the doorbell press event appear.
Chime Timing (Tuya Scenes, Not Simple Switches)
One important detail I initially forgot to mention: the Tuya relay can’t just be toggled on/off directly from Google Home if you want sane chime behavior. Instead, I had to create Tuya “Scenes” – one per door – to control how long the chime is energized.
Tuya Scene Configuration
I created two scenes in the Tuya Smart app:
Front Door Chime Scene
- Turn Relay Channel 1 ON
- Delay 22 seconds
- Turn Relay Channel 1 OFF
Rear Door Chime Scene
- Turn Relay Channel 2 ON
- Delay 6 seconds
- Turn Relay Channel 2 OFF
The longer front-door duration matches the length of the chime melody, while the rear strike needs only a short pulse. This approach ensures:
- No stuck relays
- No continuous ringing
- Predictable chime duration regardless of how long the doorbell button is pressed
Finding Scenes in Google Home (Yet Another Easter Egg)
Once the scenes existed, I assumed they’d be easy to trigger from Google Home. They were not. Scenes do not show up where you’d expect in the Google Home automation UI. I had to dig to find them as an available action. Eventually, I found them listed under Scenes as an automation action, which allowed me to:
- Trigger the Front Door Chime Scene on front doorbell press
- Trigger the Rear Door Chime Scene on rear doorbell press
Combined with the legacy “Previous householder editor”, this finally made the whole system work end-to-end.
Bonus Headaches: Wi-Fi & VLANs
To make things more fun, the Tuya relay requires:
- 2.4 GHz Wi-Fi
- WPA2 only
- Maximum 20-character password
That finally pushed me to do what I’d been putting off: Proper IoT SSID + VLAN separation. After I got that working:
- I factory-reset both Nest Hello units
- Removed them from my account
- Re-added them using the IoT SSID
- Tested functionality
mDNS Gotcha
Video responsiveness was terrible at first. The fix was enabling mDNS on both the primary and IoT VLANs. I had to reboot my firewall appliance before testing. That made a huge difference.
Final Results (So Far)
- Doorbell press → ~0.5 second delay → physical chime rings
- About the same delay as: “Someone’s at the front door” on Google Nest speakers
- Video responsiveness is still being tested, but so far it’s solid
- Most importantly: no more phantom ringing at 5:30 AM